If you are even remotely familiar with the popular online programming and gaming platform Roblox, then you must also be aware of the avatar shop which players can access through the platform’s engine called Roblox Studio.
The avatar shop is nothing but a dedicated online store for Roblox where users can purchase and use various cosmetic add-ons like clothes on their avatars to make their gaming experiences in the digital world that much more enjoyable.
Some players like to use pre-created, ready-made outfits for their avatars from the avatar shop, but many others also look to create their very own outfits from scratch to add their personal touch to them, to either use the pieces of clothing for themselves or to make them available for sale through the shop, so that the entire Roblox community gets to experience it.
With millions of players playing this game today, seeing various avatars controlled by different users running around in similar-looking clothing is quite common and confusing in equal measure. To avoid incidents like these, however, players can design and create their own clothes to help them stand out from the crowd.
Although the process may sound quite daunting and technical from the surface, especially for people who are not too tech-savvy, to begin with, it really isn’t that difficult if you follow our comprehensive guide.
Interested in playing Roblox? Roblox now.gg setup: Play on your browser hassle-free.
So let’s see the ways in which users can create clothes on Roblox.
Table of Contents
How Many Types of Clothing Are There?
As of right now, players can create three clothing options, a Shirt, a T-shirt, and Pants.
Shirts are by far the easiest of three options to create and it is also the most versatile in terms of what players can do and add to it to make it appealing for the creators themselves as well as potential buyers looking to purchase the clothing option from Roblox’s marketplace as they cover and wrap the entire body of the avatar, not just one side.
T-shirts on the other hand can only have an image and a single color option in it, which massively limits the creativity of the kids trying to create it, and moreover it doesn’t appear as a great purchase choice for anyone at the store as well due it only covering one side of the avatar and not completely covering it.
How To Make Clothes On Roblox
Without any more delays, let’s get to know all about the steps involved in creating clothes on Roblox:
1) Create a Roblox Account and Earn Robux
The first step in creating your own brand of clothes on Roblox is to create an account.
Once that initial step is completed, players will then have to have access to some Robux. Robux is basically a type of premium currency that users use to purchase in-shop items like clothes, accessories, games, in-game items, etc., on Roblox.
There are currently three ways in which players can obtain some much-need Robux. Although users will need only 10 Robux to upload their clothes to the marketplace, these are ways to obtain more if they ever feel the need to.
The first and easiest way to earn Robux is to play games on Roblox regularly. The more you play, the more you earn; it’s as simple as that.
The second way is to create things like clothes and list them in the official marketplace belonging to Roblox for other users to purchase them in exchange for Robux. This is a highly rewarding way of making large sums of Robux, provided the creator of the clothing items is skilled enough in his craft to keep producing high-quality clothing options which other Roblox players would like to buy.
The third and final way to obtain Robux is to purchase it with real-world money. Roblox has two ways in which users can buy Robux with real money. Users can either for their bulk packages, which range from 80 Rubox for $0.99 to 10,000 Robux for $99.99.
Users can also choose to subscribe to their monthly Robux plan for $4.99/month, in which they will receive 450 Robux per month in their account.
2) Create an Avatar and Select the Clothing Option
Now, before we select which clothing option we would like to choose, we must first create our avatar. To do this, log into your newly created Roblox account and navigate to the left-hand side menu where you will see an option labeled ‘Avatar‘. Click on this option to open the avatar editor page and create your very own Roblox avatar.
Once you have successfully created your avatar, it is time to create the clothing option of your choosing. To do this, users will have to navigate to the top right-hand corner of the page and click on the option labeled ‘Create‘.
Please note: Some users might see a black command prompt screen instead of the create dashboard at this stage, so please do not panic. You will see two options in front of you, One will be a big button with ‘Start Creating’ written on it, followed by a smaller line just below it saying ‘Manage my experiences’.
Click on the second small line saying ‘Manage my experiences’ and it will take you directly to the ‘Manage my experiences’ dashboard where you were initially supposed to land.
Once you have arrived on the ‘Manage my experiences‘ page, on the left side, you will see a long list of options to click on like badges, audio, animations, etc. From these options, click on the ‘Shirts‘ option to open the ‘Create a shirt‘ page.
3) Download The Shirt Template & Edit It
Now, users will need the all-important shirt template which they will require to develop their clothes successfully.
To download the template, users will see a line on the ‘Create a shirt’ page saying ‘Did you use the template? If not, download it here‘ option. Upon clicking the download button, users will be taken to a new tab with an image of a template like this:
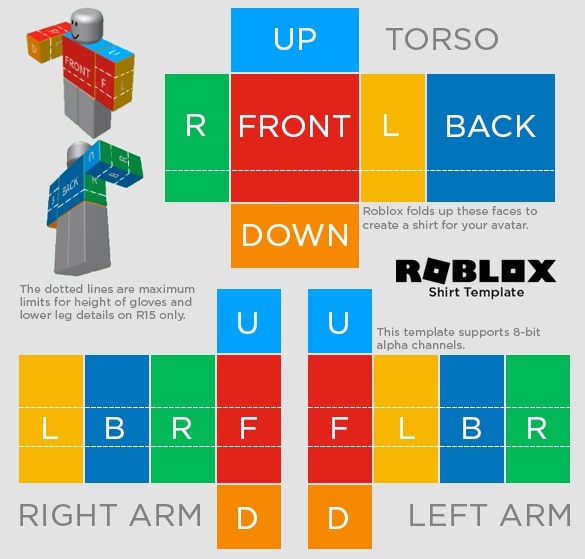
Once on this page, users have to right-click on the image and save it wherever they wish to in order to use it as a guide to develop their choice of clothing.
After downloading the template, open the image with the help of an editing tool like Adobe Photoshop, Photopes, etc., and edit the template according to your preferences. Once you are happy with the edited version of your template, save it as a JPEG image on your computer.
4)Testing Your New Shirt Template
Before one decides to upload their newly created shirt template for real, it is always a great idea to do a little ‘trial’ run of it on Roblox Studio to make sure it looks good and performs well as intended before releasing it for the public to experience.
So let’s see how we can do that;
In Roblox Studio, navigate to the Plugins tab and click on the ‘Insert Rig’ option to choose a tig type which Roblox allows users to use to try out their newly created clothing options.
From here, go to the ‘Explorer‘ on the right-hand side of the screen and click on the ‘Workspace‘ option. Select the ‘ Dummy ‘ option from the resulting options from the dropdown menu.
Next, right-click the dummy option and select the shirt graphic or any other clothing option to insert in the dummy.
Once inserted, select the shirt from the dropdown row under the ‘properties’ section. Once the shirt is selected, it will automatically apply the shirt to the dummy for you to carefully look at it and ensure it meets all the required expectations.
It is recommended for beginners to test their choice of clothing on a few other ‘Build Rigs’ to make sure the clothes are compatible with numerous other types of player models as well, which users are currently using on Roblox, to attract them to make a purchase ultimately.
5) Upload Your Custom Shirt Template On Roblox
Now that you have successfully edited the default shirt template downloaded from Roblox, it is time to upload your custom-made shirt image on it.
To do so, go back to the ‘Create a Shirt‘ page from where you had initially downloaded the shirt template in the first place. On this page, you will see a small button labeled ‘Choose File‘. Click on it and upload your newly created shirt template.
Please note that the required size of the uploaded image is 585×559. Make sure your image size is of the same dimensions to avoid any errors in the uploading process.
Once you have selected the shirt image you want, click on the big green button located below the previous option labeled ‘Upload for 10 Robux‘.
On clicking the green upload button, your newly created shirt design will now be added to the list of available shirts displayed on the same ‘Create a Shirt‘ page.
Please note that your shirt will take a bit of time before it becomes fully usable, as Roblox from their end conducts a few thorough quality checks on all newly uploaded images to avoid approving any unwanted, offensive, or derogatory designs used on users’ clothing choices. The quality check process can take anything from 10 minutes to an hour, so please be patient.
In the meantime, however, you can configure the settings for your newly created shirt.
6) Configure Your Shirt’s Settings
Once you have added your shirt on Roblox, navigate to the ‘Create a shirt’ page and scroll down all the way to the section that displays your newly added shirt.
Next to your newly added shirt, you will see a button with a small gear icon and a downward-facing arrow on it. Click on it select the ‘Configure’ from the two available options and go to the settings page for your shirt.
On this page, users will have total control over certain settings regarding their newly-created shirt like its name and description. Moreover, the user will also have access to two toggle options, with one enabling the shirt to be open to comments from other Roblox users and the second one being whether or not they want to put their shirt up for sale.
If you want to put your shirt up for sale, switch the toggle option to be active and set the desired price of the shirt you would like to receive in the column provided below.
Please note that Roblox takes 30% of whatever amount you earn after selling a particular piece of clothing, so price your clothes accordingly. (For example, if you tell a shirt for $10 on the marketplace, Roblox will take $3 from it and you will receive $7)
After you have made all the necessary changes, click the ‘Save Changes button to confirm your shirt’s settings.
Interested in making your own custom clothing on Roblox? Visit Roblox’s official website to start designing today.
Conclusion
So there you have it. These were the necessary steps one needs to follow if one wishes to create one’s very own clothing on Roblox, whether for personal use or for the sake of making money by selling them on the marketplace.
A few points to remember: Be sure to let your creative minds run wild while designing clothes on Roblox to connect with a larger, more diverse audience, as people are always on the lookout for unique clothing options to try out, but do not put anything offensive or illegal on them.
Moreover, it is also always a great idea to keep the pricing of the clothes competitively attractive but in sync with their popularity as well. Don’t overprice or underprice your clothes. Find what products are priced at and charge something similar initially. Once your product gains popularity, you can become more flexible with its pricing.